
Articles
Creating a Facebook Fan Page
Author: Geoff B.02/10/2009
Facebook has become one of the most popular social networking websites on the Internet today.
In this article, I'll illustrate how to take advantage of the "pages" feature to promote your website and your work.
In addition to another venue for promoting your work, there is a significant search engine ranking benefit to having external links to your website (as discussed in one of my previous articles). Given the popularity of Facebook, the "pages" feature is one that you should consider taking advantage of.
Facebook also allows you to integrate certain features provided by ImpactFolios. We'll cover this in this article as well.
- To start, log into your Facebook account (or create one, if you haven't already), and then visit the pages section on facebook: http://www.facebook.com/pages/create.php
- The first step is to select the type of page you are creating, which in our case would typically be under "Artist, Band, or Public Figure", and the "Visual Artist" option.
You'll also want to give your page a name. The page name should generally be your name, or the name of your website. Click the "create page" button.
Note that your page will not be available until you publish it, so you can create your page and have it ready before it is available for public viewing.
- Next, you'll be shown a preview of your page, which at this point will be relatively empty. Click on the "Edit Page" link, found on the upper right menu.
- Start by filling in the sections under the "Information" heading. Your information is broken out into the following categories:
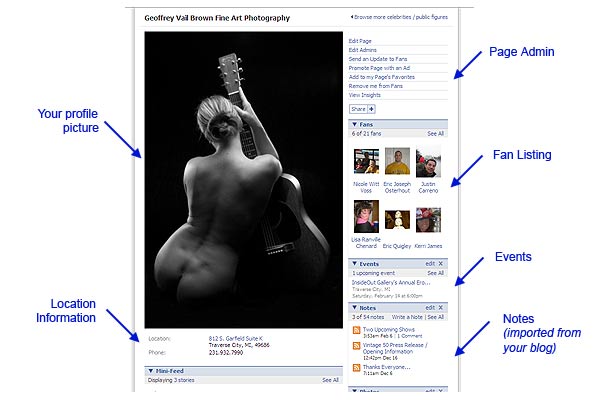
- Profile Picture - This is the picture that appears on the page view of your site. You can use a logo, a sample piece of art work, or some other image.
- Basic Info - Primarily details your contact info and location. Location may link to a map to your studio or the location that you list. This is optional.
- Detailed Info - This section includes personal info, such as a bio. Additionally, you have an area to list your website. It is particularly important to list your website address in this section, as it gives "fans" a link to your website, and also has some search engine ranking benefits.
- Contact Info - Your email address.
- Profile Picture - This is the picture that appears on the page view of your site. You can use a logo, a sample piece of art work, or some other image.
- After filling in the basic information, you have a variety of features available under the Applications section, including image upload, Discussion boards, Events, etc. You can add and remove any of these applications, as desired. Of particular interest is the Notes section, which you can integrate with your blog at ImpactFolios, so that it is automatically updated any time you post a new blog. To set this up, click on the pencil icon in the "notes" section, and click edit.

- On the next page, you'll see the "notes settings" section on the right side of the page. Under this, there is a link to "Import a Blog". Click this link to setup your blog import.
- On the Blog Import page, you'll see an area for a web url to your blog. The feed for importing to Facebook is slightly different than the feed provided on your blog itself. The easiest way to obtain the blog url is to visit the blog on your site, and copy the URL. In my case, the link to my blog is:
http://www.gvbfineart.com/page122.htm
You'll need to add the following code at the end of the url:
?rss=1&nolimit=true&longtext=true
Thus, the final feed url would be:
http://www.gvbfineart.com/page122.htm?rss=1&nolimit=true&longtext=true
If you are having trouble figuring out your feed url, send us an email, and we can provide the link for you.
After pasting the URL, check the box consenting to Facebook's terms, and then click "Start Importing". - The import process may take a few minutes, depending on the size of your blog. Once the feed has been processed, you will be presented with a preview of your blog. Scroll down to the bottom and click "confirm import". After this point, all existing blogs will appear under the "notes" section. New blog posts through ImpactFolios will be added to Facebook automatically.
- You can continue editing and customizing your page, until you are ready to publish. When you are ready to publish, click the "publish this page" link, typically found at the top of the page view, or in the edit view. You can still make changes to the page after it is published.
- Once you have published the page, you can promote it by sending a message to friends on your contact list.
You can also promote your facebook page by linking to it on your ImpactFolios website. The link created by Facebook is a bit cryptic and hard to remember, so to make it easier to remember, we can create a shortcut alias for you through ImpactFolios.
In my case, I have setup the alias http://facebook.gvbfineart.com so that it links directly to my Facebook page.
Creating this alias is not something you'll be able to do yourself, but we'd be happy to set it up for you - just send us an email! - Facebook provides some statistics on traffic to your page, new fans, and other data. You can find this under the "View Insights" link.

Below is a sample view of the final page, complete with fans, events and a populated notes section:
Comment on this article
Comments:
No commentsPost a comment
Please do not use this form to ask technical support questions. Instead, email help@impactfolios.comPlease log into your ImpactFolios account to post a comment.